Loading... Please wait...
 Categories
Categories
Brands
Brands
How to Build Your Own Backyard Wiffle® Ball Field
Posted by on
How to Build Your Own Backyard Wiffle® Ball Field
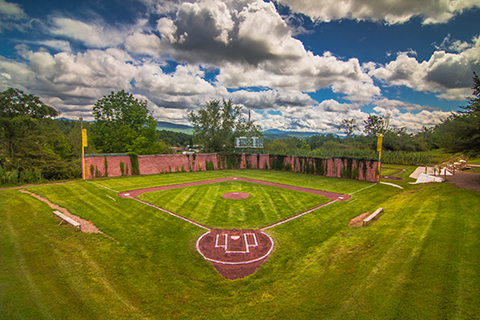
Little Wrigley-Essex VT
Bring the Big Leagues Home!
- Wiffle® ball is a classic, low-impact, all-ages game. What better way is there to play the game then turning your backyard into your field of dreams!
- Why build your own field? Convenience, endless fun, a great summer project, customize to your heart's content. Not all fields need to be a masterpiece like the above Little Wrigley field but we'll help you build your own gem.
- This guide will walk you through planning, building, and enjoying your very own backyard Wiffle® ball oasis.
Step 1: Planning Your Wiffle® Ball Paradise - Layout and Location
- Space Assessment:
- How much space do you have? (Even small yards can accommodate a mini-field.)
- Consider obstacles: Trees, sheds, fences, gardens.
- Sun direction: Where will the sun be during prime playing time? Avoid direct sun in batters' eyes.
- Field Dimensions (Wiffle® Ball Specifics):
- Distances: 100-150 feet for a respectable fence, but can be shorter or longer depending on space.
- Unique features: "Green Monster" style, short porch, etc.
- Wiffle® ball fields are much smaller than baseball fields.
- Pitching Mound to Home Plate: Typically 45-50 feet.
- Base Paths: Often shortened to 45-60 feet.
- Outfield Fences: This is where you can get creative!
- Drainage: Is your chosen spot prone to puddling? Consider minor grading if necessary.
- Safety First: Ensure clear boundaries, no sharp objects, and enough space for throws and swings.
Step 2: Essential Materials - What You'll Need
- Marking the Field:
- Measuring tape (100ft+)
- String or twine
- Stakes or spray paint (for initial layout)
- Chalk or field marker (for permanent lines – optional, but nice for realism)

Check out our Port-a-Field Lining Kits Here
- Bases & Plates:
- Home Plate: Can be a rubber mat, painted wood, or even just a flat piece of material.
- Bases: Store-bought rubber bases, painted squares of wood, or even old tires cut in half.
- Pitcher's Mound: A small raised area is ideal. Can be built with dirt, a rubber mat on a slight incline, or even just a designated spot.
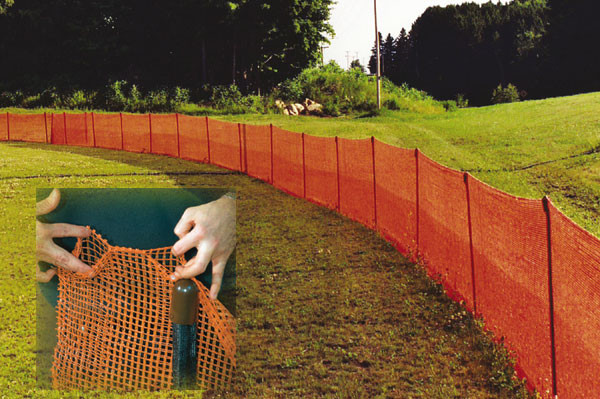
- Fencing (Optional, but highly recommended for a "real" feel):
- Materials: Snow fencing, mesh netting, chicken wire, PVC pipe frames with netting, old pallets, or even just a painted line on a fence.
- Posts: T-posts, wooden stakes, or PVC pipes.
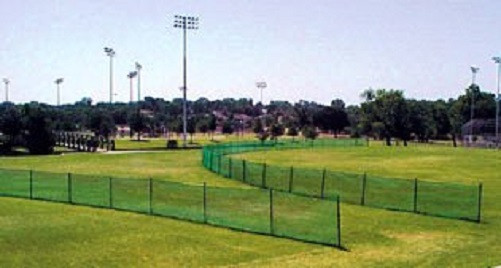
Check out our Premium Outfield Fence Kit with Poles Here
Check out our EZ Pocket Net Fences Here
- Scoreboard (Optional, but adds to the fun!):
- DIY: Plywood with hooks for numbers, chalkboard.
- Simple: Just a whiteboard.
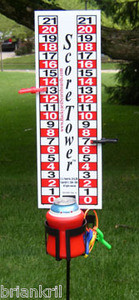
Check out our ScoreTower with Beverage Holder Here
- Strike Zone - build your own strike zone out of pvc piping(just do an internet search for building a wiffle® ball strike zone and you'll come up with numerous easy to build DIY plans or go old school and simply use a lawn chair!
- Seating/Dugouts (Optional):
- Picnic benches, folding chairs, small canopy for shade.
- Maintenance Tools: Rake, shovel, garden hose.
Step 3: Building Your Field of Dreams - Step-by-Step Construction
- 1. Measure and Mark:
- Start with home plate.
- Measure out to the pitcher's mound.
- Lay out the base paths using string and stakes to ensure squareness.
- Mark the outfield fence perimeter.
- 2. Install Bases and Plates:
- Secure home plate.
- Dig shallow depressions for bases if burying them, or simply place them.
- Construct or designate your pitcher's mound.
- 3. Erect the Outfield Fence (if desired):
- Install posts at regular intervals along your marked fence line.
- Attach your chosen fencing material securely.
- Tip: Consider a "foul pole" for extra realism!
- 4. Define the Lines:
- Use chalk, field paint, or even sand to mark foul lines and the batter's box.
- 5. Add the Extras:
- Set up your scoreboard.
- Place seating.
- Consider a designated bat/ball area.
Step 4: Maintenance and Enjoyment
- Basic Upkeep:
- Keep the field clear of debris.
- Rake and smooth out high-traffic areas.
- Re-mark lines as needed.
- Rules of the Game (Wiffle® Ball Etiquette):
- There are many ways to play the game, here is where you can have some fun and be creative, (e.g., no leading off, ghost runner, "one-pitch" rule)
Click Here to see the Original Wiffle® Ball Rules but feel free to make up your own rules
- Host Your Inaugural Game!
- Invite friends and family.
- Have a mini-tournament.
- Grill some hot dogs!
Conclusion: Play Ball!
Need a little more inspiration? Check out our Wiffle® Ball Field Page where we share some of the greatest backyard fields ever made. Or check out our Youtube Video:
Share your own Wiffle® ball field with us and we'll post it on our website.
What are you waiting for? Grab your bat, round up your crew, and get ready for endless Wiffle® ball memories!
EXCURSIONS Journey To Health is your source for everything Wiffle® Ball!
See all of our Wiffle® Ball Equipment

WIFFLE is a federally registered trademark of The Wiffle Ball, Inc. Shelton, CT 06484 and used with permission.